This guide provides step-by-step instructions for integrating with the Mint Payments API to create payment links, allow customers to pay, and receive transaction notifications.
Developer Guide: Mint Payments Payment Links
A comprehensive integration guide for creating, processing, and verifying transactions using Mint Payments Payment Links.
This guide provides step-by-step instructions for integrating with the Mint Payments API to create payment links, allow customers to pay, and receive transaction notifications.
The Payment Link Lifecycle
The integration process follows a simple, three-step lifecycle:
- Create The Link (Server-to-Server API call): Your server makes a request to the Mint API to generate a unique payment link.
- Customer Pays (On Mint's Hosted Payment Page): The customer uses the link to access a secure payment page and complete the transaction.
- Get Notification (Via Webhook): Mint's server sends a notification to your server to confirm the transaction's outcome.
Step 1: Create The Payment Link
Your server makes a secure, server-to-server POST request to the Mint API. This call includes the amount, currency, and your internal order ID or booking terence.
For more detailed information, refer to the official Mint Payments API documentation: Create a Payment Link
Endpoint: POST https://secure.mintpayments.com/mpay/v5/payment-links
Customer Information (Optional)
Including the customer object is highly recommended:
- With Customer Info: The payment form is pre-populated, leading to a better user experience and higher conversion rates.
- Without Customer Info: The customer must enter all their details manually on the payment page.
Payment Link Modes (In Response)
The API response will contain two different URLs for two different use cases:
url(Standard Mode): This is the customer-facing link. It's designed for self-service, supports all payment methods (including digital wallets and 3D Secure), and is what you should send to your customer.virtual_terminal_url(VT Mode): This is an agent-assisted link for your staff to process payments manually (e.g., for phone orders). It disables customer-interactive methods.
Step 2: Customer Pays
This part of the process is handled entirely by Mint's Hosted Payment Page (HPP).
- Send Link: Your system receives the
urlfrom the API response and sends it to the customer (via email, SMS, invoice, etc.). - Pay on HPP: The customer opens the link, sees Mint's secure payment page (pre-populated if you sent customer data), and enters their payment details.
- Get Confirmation: Mint processes the payment, handles 3D Secure (if needed), and shows a real-time success or failure message to the customer.
Hosted Payment Page Example
Below is an example of Mint's Hosted Payment Page showing the customer experience:
The HPP displays:
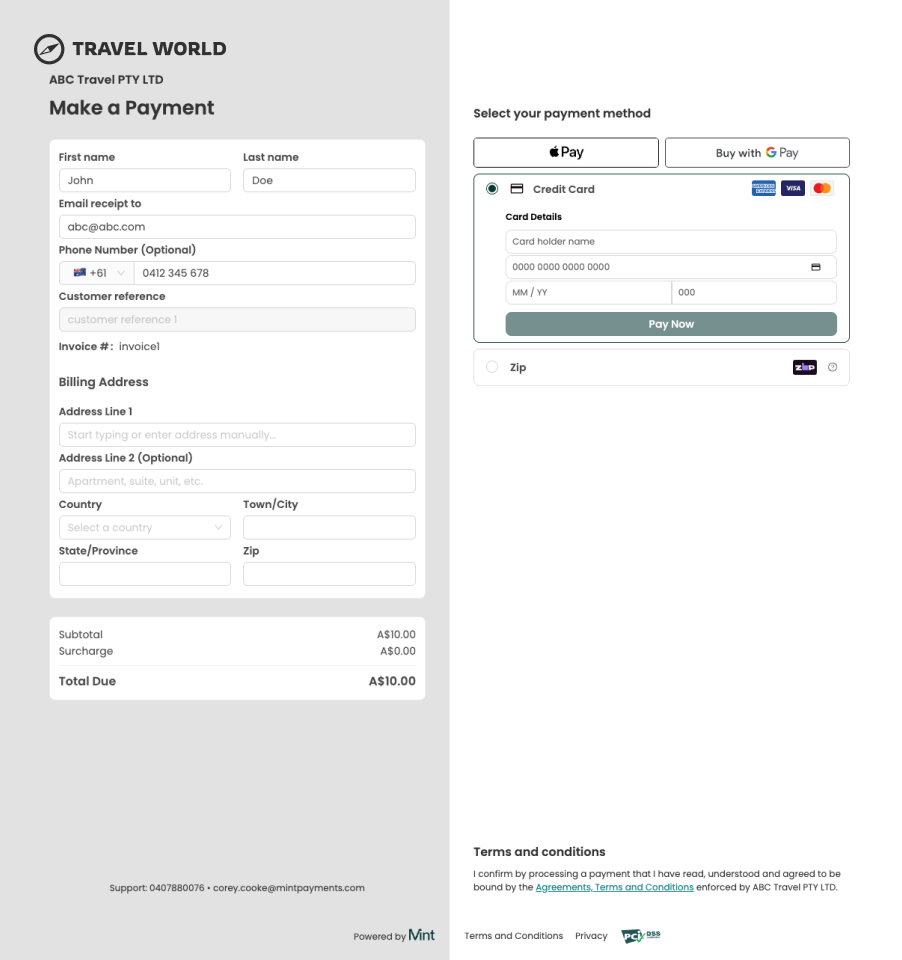
- Customer details (pre-populated when provided via the API)
- Payment method selection (Apple Pay, Google Pay, Credit Card, Zip)
- Order summary with subtotal, surcharge, and total due
- Billing address fields for card payments
Step 3: Get The Webhook Notification
As soon as the transaction is complete, Mint's server sends an asynchronous POST request to your pre-configured Webhook URL.
This payload is the definitive source of truth. It confirms the transaction status so you can update the order in your database and fulfill the purchase.
For more detailed information on integrating webhooks, refer to the official Mint Payments documentation: Mint Webhook Integration Guide
Example Full Webhook Payload
This is a more complete example of the JSON data your endpoint will receive.
POST /your-webhook-endpoint
Content-Type: application/json

{
  "transaction_reference": "123456789123456789",
  "customer_reference": "Ref987654",
  "invoice_number": "Inv123456",
  "transaction_time_utc": "2023-08-30 04:36:08 AM",
  "status": "APPROVED",
  "amount": "101.00",
  "currency": "AUD",
  "masked_card_number": "411111******1111",
  "card_brand": "visa",
  "card_holder_name": "John Smith",
  "card_expiry": "05/2026",
  "email_address": "[email protected]",
  "mid": "12345678",
  "trading_name": "ABC Travel Co",
  "sale_amount": "100.00",
  "surcharge": "1.00",
  "webhook_type": "HPP",
  "payment_type": "CreditCard"
}
Key Webhook Fields Explained
| Parameter | Description |
|---|---|
status | Crucial. The result of the transaction. Handle all possible values: APPROVED, DECLINED, PENDING, PRE_AUTHORISED. |
transaction_reference | Mint's unique ID for the transaction. Store this for refunds and reconciliation. |
amount | The total amount charged to the customer (sale_amount + surcharge). |
sale_amount | The original sale amount (excluding surcharge). |
surcharge | The fee (if any) that was applied. |
webhook_type | The source of the transaction. For payment links, this will be HPP. Other values: VT, API, CARD_PRESENT. |
payment_type | The method used (e.g., CreditCard, POLi, BankAccount). |
card_brand | The brand used (e.g., visa, mastercard, amex). |
Integration Options
There are two ways to integrate with Mint's Hosted Payment Page. These options differ in how payment links are created and in the customer-facing payment experience they render.
| Option | Method | Payment Page | Best For | Complexity |
|---|---|---|---|---|
| Payment Links API (Current) | Server-to-server API call (POST /v5/payment-links) — payment parameters are configured in the request body | HPPv2 — modern, responsive React-based UI | New integrations, automated payment workflows, full surcharge control | Low |
| Configured URL HPP (Legacy) | Browser redirect with Company Token and payment parameters embedded in the URL | Legacy JSP-rendered page | Existing integrations not yet migrated | Low |
Payment Links API (Recommended)
Your server calls the Mint API to create a payment link, then delivers the returned URL to the customer. This is the current and recommended integration path. Payment links created via this API render HPPv2, Mint's modernised hosted payment page built with responsive React components, providing an improved user experience across devices. It provides:
- HPPv2 — modern, responsive payment page UI
- API Key + Business Unit authentication
- Decimal amount format
- Surcharge controls (
prevent_surcharging,surcharge_discount_percent) - Webhook-based result delivery
Configured URL HPP (Legacy)
The original integration method where the merchant redirects the customer's browser directly to a Mint URL containing the Company Token and payment parameters. This renders the legacy JSP-based payment page with a less responsive layout. This method is deprecated — see Configured URL Hosted Payment Page for full documentation.
New integrations must use the Payment Links API. The Configured URL HPP remains available for existing merchants who have not yet migrated, but renders the legacy payment page rather than HPPv2.
Operating Modes
Both integration options support two operating modes:
| Mode | Description | When to Use |
|---|---|---|
| Standard Mode | The payment link is sent directly to the customer for self-service payment. Supports all payment methods including digital wallets and 3D Secure. | Customer-initiated payments (email, SMS, invoice) |
| Virtual Terminal Mode (MOTO) | A merchant agent enters the customer's payment details into the Mint-hosted interface. Disables customer-interactive methods. | Agent-assisted payments (phone orders, call centre) |
To enable Virtual Terminal Mode, set virtual_terminal_mode=true when creating the payment link. The API response returns separate URLs for each mode: url (Standard) and virtual_terminal_url (VT).
Warning — Virtual Terminal Mode does not support 3D Secure. Because the cardholder is not present to complete 3DS authentication, transactions processed via Virtual Terminal Mode are not covered by the liability shift that 3DS provides. This means the merchant bears full liability in the event of a fraud-related chargeback.
API Sequence Flow (Text-based)
Here is the step-by-step data flow for a successful transaction:
- Merchant Server to Mint API: The Merchant Server sends a
POST /payment-linksrequest to the Mint API to create a payment link, including the amount andmerchantReference. - Mint API to Merchant Server: The Mint API responds with a success message, including the customer-facing
url. - Merchant Server to Customer: The Merchant Server sends this
urlto the Customer (e.g., via email or SMS). - Customer to Mint HPP: The Customer clicks the
url, which opens Mint's Hosted Payment Page (HPP). The Customer enters their payment details. - Mint HPP to Customer: The Mint HPP processes the payment and displays a "Payment Successful" message to the Customer.
- Mint API to Merchant Server (Webhook): The Mint API sends an asynchronous
POSTrequest to the Merchant Server's pre-configured webhook endpoint, notifying it of the transaction'sstatus(e.g., "APPROVED"). - Merchant Server to Mint API: The Merchant Server responds to the webhook with a
200 OKstatus to acknowledge receipt. - Merchant Server to Customer: After processing the webhook, the Merchant Server sends a confirmation (e.g., an email) to the Customer, indicating that their order is paid.